
A Process for Mapping Metroid 1 Hacks
If you've been around here recently, you may have noticed that I've been busy making 1:8 scale maps of certain Metroid 1 rom hacks. It's been pretty fun, and I've been gradually iterating on my process to make it go more quickly.
The premier Metroid 1 editor, Editroid, helpfully has the capacity of automatically generating maps at various predefined scales. Thus, 1:1 screenshot maps are actually quite trivial to make. However, I often prefer the aesthetic of smaller, more information-dense maps, which is where we run into some of Editroid's shortcomings.
The Problem
Take this "high-quality" rip of the starting area of Metroid X, for instance:
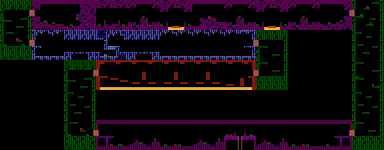
It's not bad, per se, but it's not as clean as we would like. Each tile's color is the average of its constituent pixels, resulting in a mess of colors and textures rather than the nice flat blocks of color we want. Moreover, if you look closely in some areas you can see evidence of gridlines between screens, which is something we want to avoid. Overall, this is not a good starting point.
Nevertheless, using this kind of image as a base is how I made my map of Junkoid. In that case I painstakingly traced over every pixel of the original map to clean it up. It felt rewarding, but not in a way that respected my time. I knew there had to be a better approach.
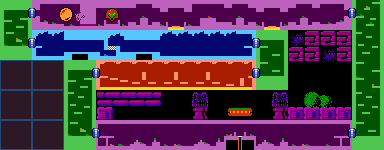
Enter the low-quality map rip (another option Editroid supports):
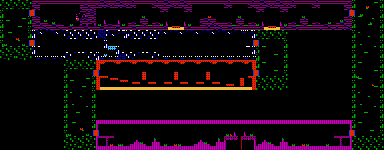
At first this doesn't look too promising, but looks can be deceptive. One advantage of this approach is that since only one pixel of each tile is sampled, we don't have gobs of extra color information to work with --- just the native NES colors. Another advantage is that there aren't any tell-tale gridlines hiding anywhere.
The question that remains here is if there's a way to get rid of the obvious disadvantages to this method.
The answer is quite simple: we're gonna ROM hack these ROM hacks (just a smidge).
The Process
The basic process is as follows:
- Expand the ROM in Editroid (if necessary). This repackages the graphics into very nice and orgainized CHR-ROM banks for each individual area, as opposed to having shared CHR-RAM pages spread willy-nilly all over the ROM.
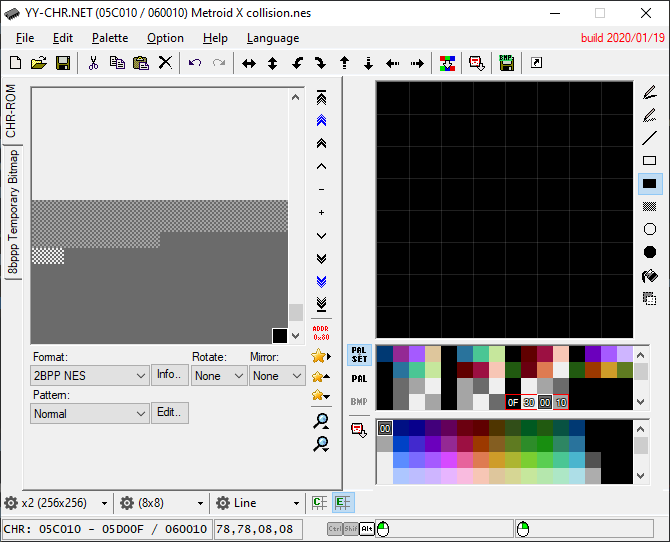
- Replace the CHR-ROM bank for each area with this pattern using YY-CHR (or any NES compatible CHR editor):
- Generate the map with Editroid using the "low-quality" setting, and viola!
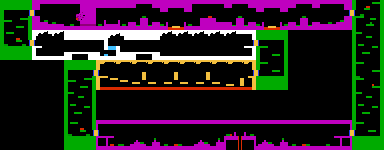
As you can see, this actually produces rather respectable results, with the nice flat blocks of color we wanted in the first place.
This approach relies on the fact that collision in Metroid 1 depends on the 8x8 tile numbers, that every area uses the same collision definitions, and that nearly every hack uses standard collision as well. In other words, it’s free real estate.
From there, it's just a matter of color correction, manual adjustments, item overlays, door overlays, marking destructible blocks (and so on) to make a complete and aesthetically pleasing map:
This process is much less labor intensive than what I did with Junkoid, so I’ve been able to make these a lot more quickly than I would have been able to otherwise. It's perhaps not as intimate and meticulous of a map-making approach, but it still feels quite rewarding to me.
Helpful Tips
Here are some miscellaneous tips and tricks for you folks who want to try this yourself:
- Use an image editor with layering support (anything but MS Paint, really). I've been using paint.net myself, but I'm sure that there are other options that are even more capable.
- For some reason, expanding the ROM with Editroid typically mangles the lava structure in Ridley's Lair. Make sure you fix that.
- You'll probably want to edit each area individually, so start off by ripping each individually with Editroid.
- Don't be afraid to edit area palettes, block definitions, or structure definitions in order to produce a starting result that's easier to work with.